Types of Verified Views
AVR0: Accurate Visual Representation Level 0
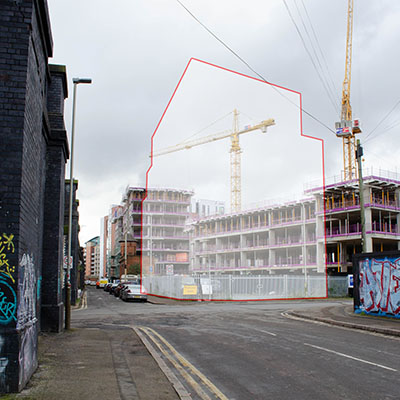
Location and size of proposal. This is the most basic visualisation. It shows just the building outline and massing, superimposed in the correct position over the approved photograph.
Usually reserved for early on development to demonstrate basic massing or views that are far from the site.


AVR1: Accurate Visual Representation Level 1
Our standard topographic land surveys will display the position of ground level surface features such as building foot prints, walls, fences, manhole covers, invert levels to name a few. Supportive height data such as ridge and eave heights, overhead lines and boundary height information will be picked up to aid planner & architects to design and create 3D models for feasibility studies and visuals for their clients. All our surveys also include contours to easily identify the lay of the land.
AVR2: Accurate Visual Representation Level 2
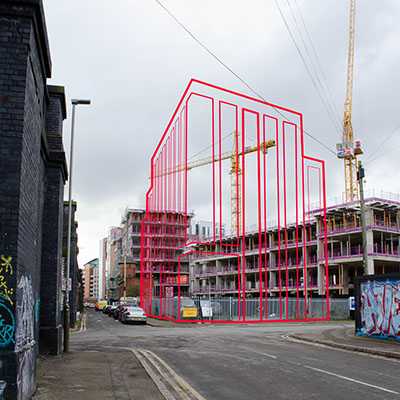
As Level 1 but with a detailed architectural form. This is a step up from AVR Level 1, as the model now includes much more detail. Windows, extrusions and shapes now give it a real sense of identity & starts to show the building in context.
This stage is often used for distance views where lighting and material aesthetics are less important. It can also be useful in projects before materials have been specified or signed off.


AVR3: Accurate Visual Representation Level 3
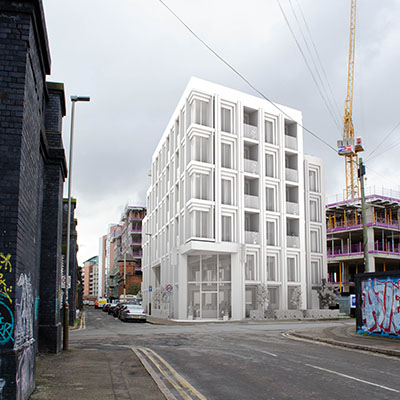
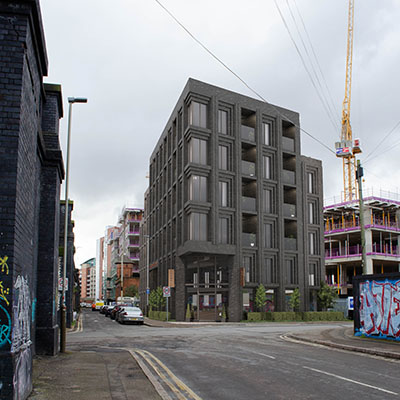
As Level 2 but now with all materials and accurate lighting in place & finished to a high level of detail. It now includes all building materials (e.g. textures, colours, finishes, foliage), as well as state of the art lighting simulations. AVR3 renders are considered photo-realistic & a true representation of the final form. They can be used for marketing, planning purposes & public consultation.
These views are reserved for the camera positions where the majority of the building is on show & it is necessary to show the building & all its details in a highly accurate image.
Verified Views Process
Photography
All photo locations / views have to be agreed with a representative from the Council prior to the survey & on site data photography being carried out.
Following the agreement with the Council final on site photography will be carried out either at the same time as the site survey or prior to the survey work being carried out to ensure camera photo location accuracy is recorded correctly.
Every effort will be made to pick a day that has favourable weather but in some cases it will be overcast days.
Survey
For each agreed photo-viewpoint location an instructional document was issued to the Castle Surveys, who were instructed (by means of a marked up photograph) to record a range of reference points that would enable a very high degree of accuracy.
Modelling
Once all survey & photographic data is acquired then we move on to the process of modelling the proposed development, this can be created from either 2d CAD files or utilising the architects 3d model.
Where Level 03 AVRs are requested the visualiser will model further details to the architect’s model to ensure a high level of detail in the proposed scheme are on show.
Camera Matching
Collected survey data & photography is then imported into the 3D space in accordance with the National Grid. Virtual cameras are positioned in line with recorded GPS data. Focal lengths etc. are aligned with camera equipment used.
Lighting & Rendering
Each camera in the 3d software will be lit independently based on the time of photography & weather conditions so that shadows fall accurately. Each view is then rendered at the same resolution as the camera used.
Post Production
The rendered output is composited into the site context photography. Depending on what level is required masking any elements of these renders to ensure the final CGi represents an accurate portrayal of the proposed scheme.
Delivery & Methodology Statement
Once all photography, survey data, modelling & post production has been completed the process of compiling all the data into one document can begin, this is the document that is issued to the client to assist with the application. The document will detail the whole process & show the data collected in an easy to understand format with the final rendered views at the requested levels shown at the end of the document.
Once all on site date has been obtained then we can start matching the date to the architectural model.
- 1. Survey data imputed into 3ds MAX.
- 2. Survey points matched to site photography.
- 3. Architect model position accurately on site.
- 4. Post production of the renders compiled to create AVR L02.
- 5. AVR Level 03 is a fully detailed CGi for planning or marketing purposes.
On Site Example 01
Building has been rendered out of Autodesk 3ds Max with a camera matched to data provided by the surveyor. Render passes are then imported into Affinity Photo or Photoshop, the outline of the building has been created by utilising an alpha channel to ensure only the proposed development is shown.
Photograph Date: 20-03-2020
Time of Day: 08.33am
Weather conditions: Overcast
Flash: No
Lens: 18mm
On Site Example 02
Building has been rendered out of Autodesk 3ds Max with a camera matched to data provided by the surveyor. Render passes are then imported into Affinity Photo or Photoshop masking out the hidden areas of the building to create a photo-montage of the proposed development.
Photograph Date: 20-03-2020
Time of Day: 08.15am
Weather conditions: Overcast
Flash: No
Lens: 18mm


